The Socket Under the Sill: A Monthly Charge-Port Check for British Weather
The charge port is one of those bits of an EV you only think about when it misbehaves. You lift the flap, push in the plug, hear the clunk, and walk off. Then one wet Tuesday the car refuses to start a charge, or the connector feels gritty, and suddenly that little socket under the sill is the most important part of the vehicle.
A monthly check takes about ten minutes and costs almost nothing. It is not about stripping anything down or poking around with a screwdriver. It is about looking, cleaning gently and replacing the cheap bits before they let water or grit do expensive things.
Start With a Clean, Dry Look
Park as you normally would, switch the car off and make sure the charging cable is unplugged. If the port has just been used in the rain, give it a few minutes and work under cover if you can. A bright headtorch beats a phone torch here because you want both hands free and a steady beam.
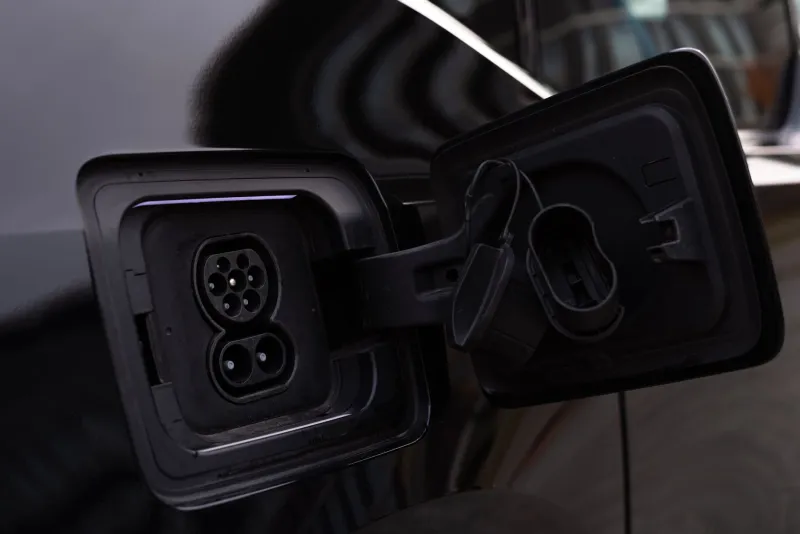
Look at the pins before you touch anything. On a Type 2 AC port you will see seven pins; on a CCS DC port there are extra pins below the main ring. What you are looking for is dullness, greenish corrosion, black scorch marks, bent metal or bits of grit sitting where the connector mates. Take a photo with your phone. It gives you a baseline and makes a tiny change easier to spot next month.
If you see blackening, melted plastic, a loose pin or anything that looks burned, stop. Do not plug in and hope. That is a job for a qualified EV technician, not a garage DIY session.
The Dust Cap Is a Cheap Part With an Expensive Attitude
The dust cap is the first line of defence and the first thing to go missing. A split cap, a snapped tether or a cap that no longer seats properly is not a cosmetic issue. It lets in the exact mixture of road spray and grit that makes pins unhappy.
Replace a tired cap with an OEM or reputable equivalent. Keep a spare in the garage because they are small, cheap and easy to lose. Avoid random aftermarket caps that fit loosely or trap water against the port; a cap that seals badly can be worse than no cap at all. Check the internal seal as well as the outer plastic. If it is perished or coated in old grease and grit, bin it.
While you are there, check the port door seal. It should sit against the body without splits or flattened sections. A quick wipe with a damp microfibre is fine. Do not soak it in silicone spray or smear it with grease unless the vehicle maker specifically says so.
Seals, Drains and the Water's Way Out
Most charge ports have a drain path nearby, often a small channel or hole at the bottom of the recess. It is designed to let water escape rather than sit around the pins. In the UK it collects leaves, grit, driveway dust and the odd bit of winter salt.
Use a soft detailing brush and a vacuum to lift debris out. Do not ram a screwdriver or drill bit down the drain. If it is properly blocked, a soft pipe cleaner or a gentle blast of low-pressure air may help, but check your manual first. The aim is to clear the path, not to enlarge it.
After heavy rain, open the flap and look for standing water. A few droplets are normal on a wet day. A puddle that stays put is a sign the drain or seal needs attention. The same applies after a car wash: avoid pointing a jet wash directly at the charge port, and dry the surround with a microfibre afterwards.
Cleaning Without Making It Worse
For the plastic surround and flap, mild soapy water on a cloth is plenty. Dry it properly. For the pins themselves, less is more. Do not use WD-40, copper grease, sandpaper or a wire brush. Do not spray contact cleaner into the port unless the vehicle manufacturer explicitly allows it, and never use abrasive cleaners on the mating surfaces.
A soft brush and a vacuum will deal with loose dust. If the pins look grimy, ask your dealer or EV specialist what they recommend for that specific connector. A lint-free cloth is useful around the outside, but do not wrap it around pins and wiggle it about. You are trying to remove surface dirt, not polish the metal.
Salt, Grit and the Monthly Log
British winters are hard on charge ports. Grit from the road, salt from the council lorry and general driveway grime all find their way into the recess. Once a month, and again after a spell of salty roads, wipe the surround with a damp cloth and dry it. Check the cap and the door seal at the same time.
Keep a simple log. Note the date, what you found and any parts replaced. Add a photo of the pins every few months. It sounds fussy, but it makes it obvious when a seal starts to perish or a cap stops fitting properly. It also gives you a record if a charging fault appears later.
When to Stop and Get Help
Do not bend pins, scrape corrosion off with a tool or force a connector that feels tight. Signs that need professional attention include a hot plug after charging, repeated failed charge starts, water inside the port, a loose port assembly, melted plastic or any burning smell. A qualified EV technician has the right gear and knows the safety side of a high-voltage system.
A monthly charge-port routine will not make your EV exciting. It will make it boring in the best way: plug in, charge, repeat. For a few minutes with a torch, a soft brush and a spare dust cap, that is a decent trade.